

Homologation codes for YCSH heaters
- E24*10R06/02*5936*00
- E49*122R00/06*1050*00
- CE EMC DL-240923008EC
- CE LVD DL-240923017SC
YCSH auxiliary heater installation, Operating- and maintenance instructions
Intended purpose of the heater
The heater is designed for this, To provide heat and maintain a comfortable temperature in following vehicles and rooms:
- Vehicles: Autos; Transporter; Caravans and mobile homes.
- Closed spaces: Huts; Garages; Storage rooms and similar environments.
Functional properties:
- Works independently of the vehicle engine, Use of diesel as an energy source.
- Requires a 12V power connection, the least 10 A can deliver.
- Automatic temperature control via sensor on the control element.
Notice: This device ensures efficient, autonomous heating in a variety of applications.
Installation guidelines in the vehicle
- Heat protection and protection against leaks: Protect nearby parts and keep possible leaks away from other components.
- Distance and ventilation: Ensure sufficient distance and sufficient ventilation in the installation location.
- Protective materials: If necessary, fireproof / use heat-insulating materials.
- Device labeling: After installation, place a manufacturer sticker in a clearly visible and accessible location in the vehicle.
Installation in the vehicle interior
- No detachable connections for exhaust gas- and fuel lines.
- exhaust- Fix the intake pipes with the clamps provided and lead them outwards.
- Installation surface must be completely flat (Use mounting plate, if uneven).
- On wooden surfaces: Leave 2-3 cm of space around the exhaust pipe or cut the perimeter, to support on metal base.
Fuel supply
- Via a T-piece or nozzle on the vehicle tank.
- For portable version, the internal heater tank can be used.
- Not TÜV compliant in Germany.
- Connect heater to vehicle tank using kit accessories.
The T-piece supplied may only be used on vehicles without Pre-feed pump in the tank be used. Otherwise, diesel can escape through exhaust gases when the engine is running / Heater suction leak.
Depending on vehicle type, Year of manufacture etc. Can be mounted on the FEED or RETURN; if necessary. Use check valve, to avoid bleeding the fuel line.
Optimum installation using the supplied nozzle. Some tanks already have recesses for mounting, some vehicles pre-installed for auxiliary heating.
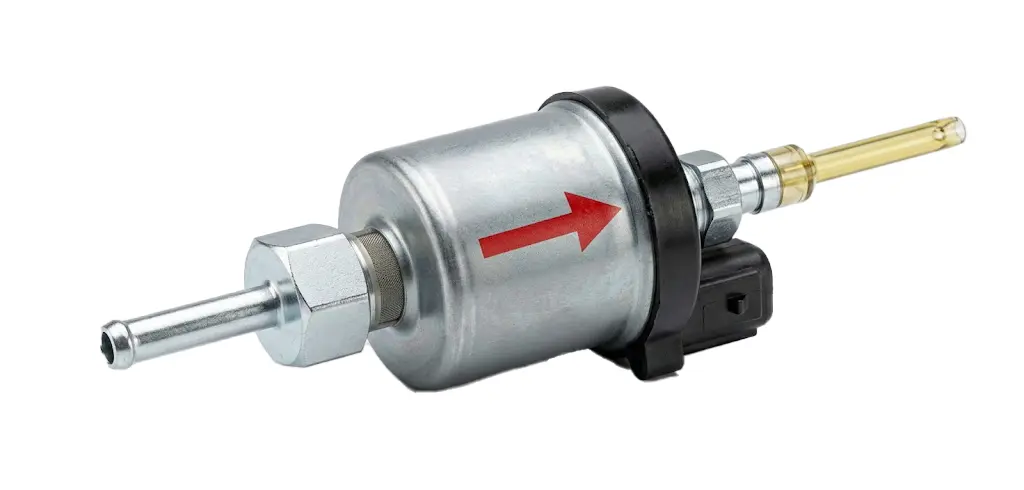
Fuel line as short as possible, max. Long 5 do not exceed m. Pump near tank (0–1 m) install, longest section between pump and heater (max. 4 m).
exhaust system
⚠ Important warning:
The device is designed and adjusted for the originally supplied exhaust pipe. No length change recommended.
If an extension is necessary, max. 30 cm, same diameter as original pipe. Incorrect modification affects performance, produces soot and irregular operation.
- Install outlet like this, that gases do not get into the vehicle.
- Keep ventilation outlet away from any interior air inlets.
Intake of combustion air
⚠ Important warning: The intake pipe is sized for this device. Extension or change of diameter/characteristics prohibited, only shortening allowed for assembly.
Unauthorized modifications may result in incomplete combustion, Functional error, Soot formation and loss of warranty.
- Do not remove combustion air from the vehicle interior.
- Install/secure suction like this, that it is not blocked.
Intake of warm air
- Air can escape from the interior (Recirculation) or outdoor area (clean, pollutant-free air) be removed.
- Outside air: Protect pipe with grid, Place the air intake like this, that there is no pollution from exhaust gases.
Warm air outlet
Install pipes safely. Exit must not be blocked.
Recommended for a boiler combination Y distributor, to share airflow.
Installation
Permitted mounting positions
- Recommended: normal position.
- Inclination: bis 30°, lowest end towards hot air outlet.
- rotation: 90° on one side; Fuel inlet and glow plug always at the top.
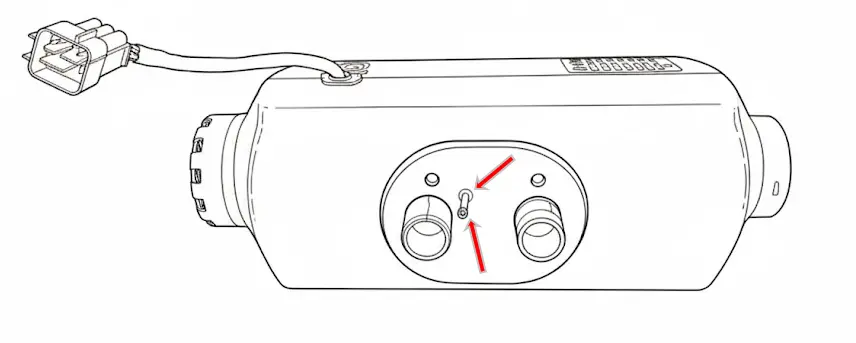
External installation
- Splash guard: before water, Snow, Protect dirt.
- Alignment: horizontal, Exhaust down, Tilt up to 30°; When rotated 90°, the glow plug and fuel inlet are always at the top.
- Exhaust gas evacuation: Align the pipe like this, that gases do not get into the vehicle or onto sensitive parts. Slight downward slope or 4 mm drainage hole at the lowest point recommended.
- Distances: Maintain a distance from heat-sensitive parts; Cable, Brake lines, Protect fuel lines and plastic parts.
- Firm attachment: Secure the heater using the original holder, to avoid damage caused by vibrations.
- Hold- and protective housing: Use special mounts or housings for additional protection against impacts and splashes of water/snow.
Change wiring harness position
- Remove top cover.
- Route the cable under the motor to the opposite end.
- Remove the rubber plug at the opposite end and insert the cable.
- Effective cable length is significantly reduced.
- Reinstall the rubber stopper at the original end, Install cover.
Assembly and fastening of the heater
For safe, Pay attention to stable assembly:
drilling: Use included mounting plate/template for:
- exhaust
- Combustion air intake
- Fuel connection
Mounting plate: Duty, if surface is uneven, annoying or with protrusions.
Ensures level footing, avoids deformation, stabilizes assembly.
- Never heat directly on ledges, The cable, Support insulation or other components.
- Contact from housing (Alu/Plastic) with external parts may cause deformation, Blocking the engine and causing irreparable damage (not covered by warranty).
seal: Insert rubber seal correctly, to prevent gases from entering.
Minimum distance to walls and furniture
Recommended: 5 cm. If not possible:
- Aluminum housing: may apply (low heating).
- Plastic housing: at least 2 cm, makes disassembly/maintenance difficult.
Warm air flow
Safe pipe installation. Without suction pipe, Maintain grid; when installing pipes equivalent grid 2kw or 5kw use.
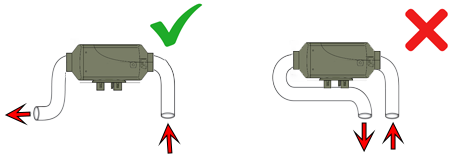
Do not suck in air directly at the outlet, max. Distance.
Strong bends only after 10 cm, 90° Avoid bends directly on the heater (Overheating errors possible).
Exhaust portable version
- Short tube: only use outside. For floor installation, Bending possible, lead away laterally.
- Long pipe: for permanent installation, double layer, robust, better seal. Kurzbar, Silencer possible in between. Short pipe can be attached afterwards, never before.

Install the combustion intake like this, that no exhaust gases are sucked in (as far away as possible, if necessary. opposite side).
Intake protect against air/water/mud/snow. Exhaust as straight and slightly sloping as possible; Drill drainage at “belly”..
Silencer as in the picture; alternatively, slightly sloping horizontally. Last pipe after the silencer towards the ground.

Ideal inclination 15°–90° (vertically possible). Plug side = outlet, position higher.
Install control panel
Place the temperature sensor correctly, wrong position = incorrect display.
- Do not install in front of airflow or on a metal surface.
- Touching it too often heats up the panel, Display temporarily distorted.
- Do not mix up cables when extending (Display damaged, no guarantee).
- Maximum 5-6m extension recommended.
Battery supply recommendations
2,5 mm² cable up to 2 m battery is sufficient. For longer cables or lead/AGM/GEL batteries:
- Cut off near main connector.
- Increase cable cross-section (4 mm² or 6 mm² depending on length).
Caution: Tension <11,8 V may malfunction, incomplete combustion, cause soot.
Heating test after installation
- Check propeller rotates freely (Blockage = engine damage, Guarantee is void).
- Check battery voltage ≥11.8 V.
- Size (2 kW / 5 kW) and pump type (22 ml) check.
- Bleed fuel until heater is reached; Avoid over-venting (portable max. 20 s).
First start of operation
If over-ventilated, white smoke develops for 5-10 minutes. Set maximum power. No smoke after ~15 minutes.
Then minimum performance, Wait for stabilization; no black smoke.
With black smoke Contact technical service: garantias@ycsh.es
Starting phases of the heating
- Fan starts to spin slightly.
- Glow plug lights up (40–60 s).
- Pump works intermittently.
- Noticeable increase in temperature after 3-4 minutes.
Maintenance YCSH heater
Fixed facility
Device 15 Run at maximum performance for minutes every 30-40 days, Renew fuel in pump and lines.
Portable system
- Recommended: Empty the tank completely, Let the heating run until an error occurs 8.
- Alternative: Fill the tank in small quantities and use proportionately.
Consequences of lack of maintenance
- Diesel turns yellow.
- Formation of deposits.
- Diesel bacteria possible.
Piston can block, Malfunction, Repairs needed.
Consequences of lack of maintenance
Over time, diesel tends to do that, themselves due to Biodiesel and moisture to decompose, which can cause the following:
✅ A color change too more intense yellow.
✅ Formation of sticky deposits at the bottom of the tank.
✅ Possible formation of Dieselbacterin.
These residues can be Piston there Pump adhere, make their movement difficult and cause the following:
❌ Heater malfunction.
❌ Total blockage of the pump.
❌ Expensive and complicated repairs (depending on device and installation).
Regular maintenance is crucial, to extend the life of the device and prevent damage, which are not covered by the warranty.
Contact & Downloads
Further information: Contact HERE
Latest version: https://ycsh.es/descargas/
Activate warranty
Activation required: https://ycsh.es/garantia/
Within 365 days after purchase. Covers manufacturing defects only.
Check initial installation, Ensure safety, no guarantee if installed incorrectly.